

Typing Practice for Beginners with Fingers: A Step-by-Step Guide
Good beginner typing practice is not about moving every finger as fast as possible. It is about teaching each finger a small, repeatable job, keeping the hands relaxed, and adding keys in a sensible order.
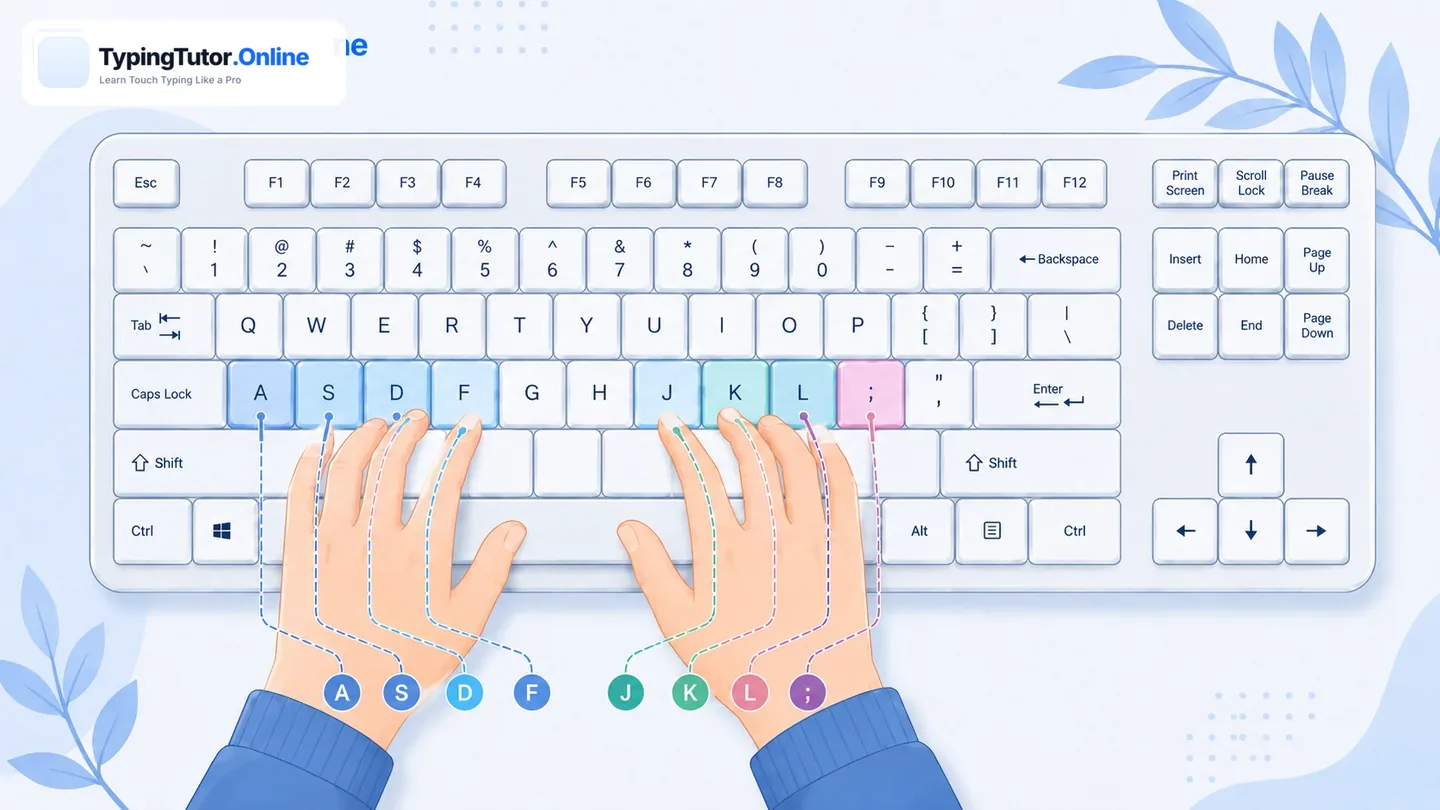
Start with the fingers, not the speed
If you searched for typing practice for beginners with fingers, the most useful starting point is a clear finger map. Place the left hand on A, S, D and F and the right hand on J, K, L and semicolon. The raised marks on F and J help you return to the home position without looking down.
Use the left index finger for F and G, the left middle finger for D and E, the left ring finger for S and W, and the left little finger for A and Q. On the right hand, use the index finger for J and H, the middle finger for K and I, the ring finger for L and O, and the little finger for semicolon and P. As more keys are introduced, each finger keeps its own territory.
A simple beginner practice order
Begin with F and J, then add nearby home-row keys. Once the home row feels stable, add top-row and bottom-row reaches while returning each finger to its home key. This is more effective than trying to memorise the entire keyboard in one session.
- Learn two or four keys at a time.
- Type slowly enough to stay accurate.
- Return to the home row after every reach.
- Keep your eyes on the screen rather than the keyboard.
- Use short, repeated sessions instead of one exhausting session.
Keyboard typing finger position practice online free
TypingTutor.Online provides free guided lessons with an on-screen keyboard and hand guidance. The lesson sequence introduces keys progressively, so finger placement and actual typing practice happen together rather than as separate activities.
Start the free typing tutor Open the finger placement guide
Accuracy before WPM
A beginner who types slowly with the correct fingers is building a stronger foundation than someone who types faster while constantly looking down or using random fingers. Aim first for clean, controlled keystrokes. Speed usually improves as the movements become automatic.
What should a beginner practise each day?
A useful daily session can include five minutes of guided lessons, a few minutes of word or sentence practice, and a short test at the end. If your hands become tense, stop and reset your posture before continuing. The goal is repeatable technique, not forcing a score.
Beginner finger practice: a seven-day starter plan
On days one and two, concentrate on the home-row anchors and short two-hand patterns. On days three and four, add one small group of new keys and continue mixing the earlier keys. On days five and six, type short real words and sentences. On day seven, take a short test and review the keys that caused the most mistakes. The exact pace can be slower or faster; the important part is that old keys stay active while new ones are introduced.
Should beginners look at the keyboard?
Looking down occasionally at the very beginning is understandable, but it should not become the practice method. Keep a finger guide or on-screen keyboard available and try to solve mistakes by touch. The goal is to build a physical map of the keyboard so your eyes can stay on the text you are typing.
How do you know when to add more keys?
Add new keys when the current movement feels controlled and accuracy is reasonably stable. You do not need perfect mastery before moving forward, but repeated confusion about finger assignment is a sign that another short practice round will help.