

Touch Typing Finger Chart & Placement Guide
Use this touch typing finger chart to see where your fingers should rest and which finger is responsible for each key on a standard QWERTY keyboard.
Find the right finger for every key
Press a letter on your keyboard or select a key below. Each colour identifies a finger; the feedback names it too. On small screens, swipe across the keyboard.
Finger placement with real-looking hands: see where each finger belongs
Not sure which finger to use when typing? Start with the free, interactive QWERTY finger chart above, then compare it with the illustrated hands below. Together, they show which key to press, which finger is responsible, and where your hands should rest. This visual approach is useful for first-time typists, students and learners correcting their typing technique.
With TypingTutor.Online, you can practise while looking at your computer screen instead of repeatedly looking down at your physical keyboard. Follow the highlighted letter and on-screen finger guidance, press the matching key, then return your finger to the home row. Over time, familiar positions can help you rely less on visual hints and develop touch typing by feel.
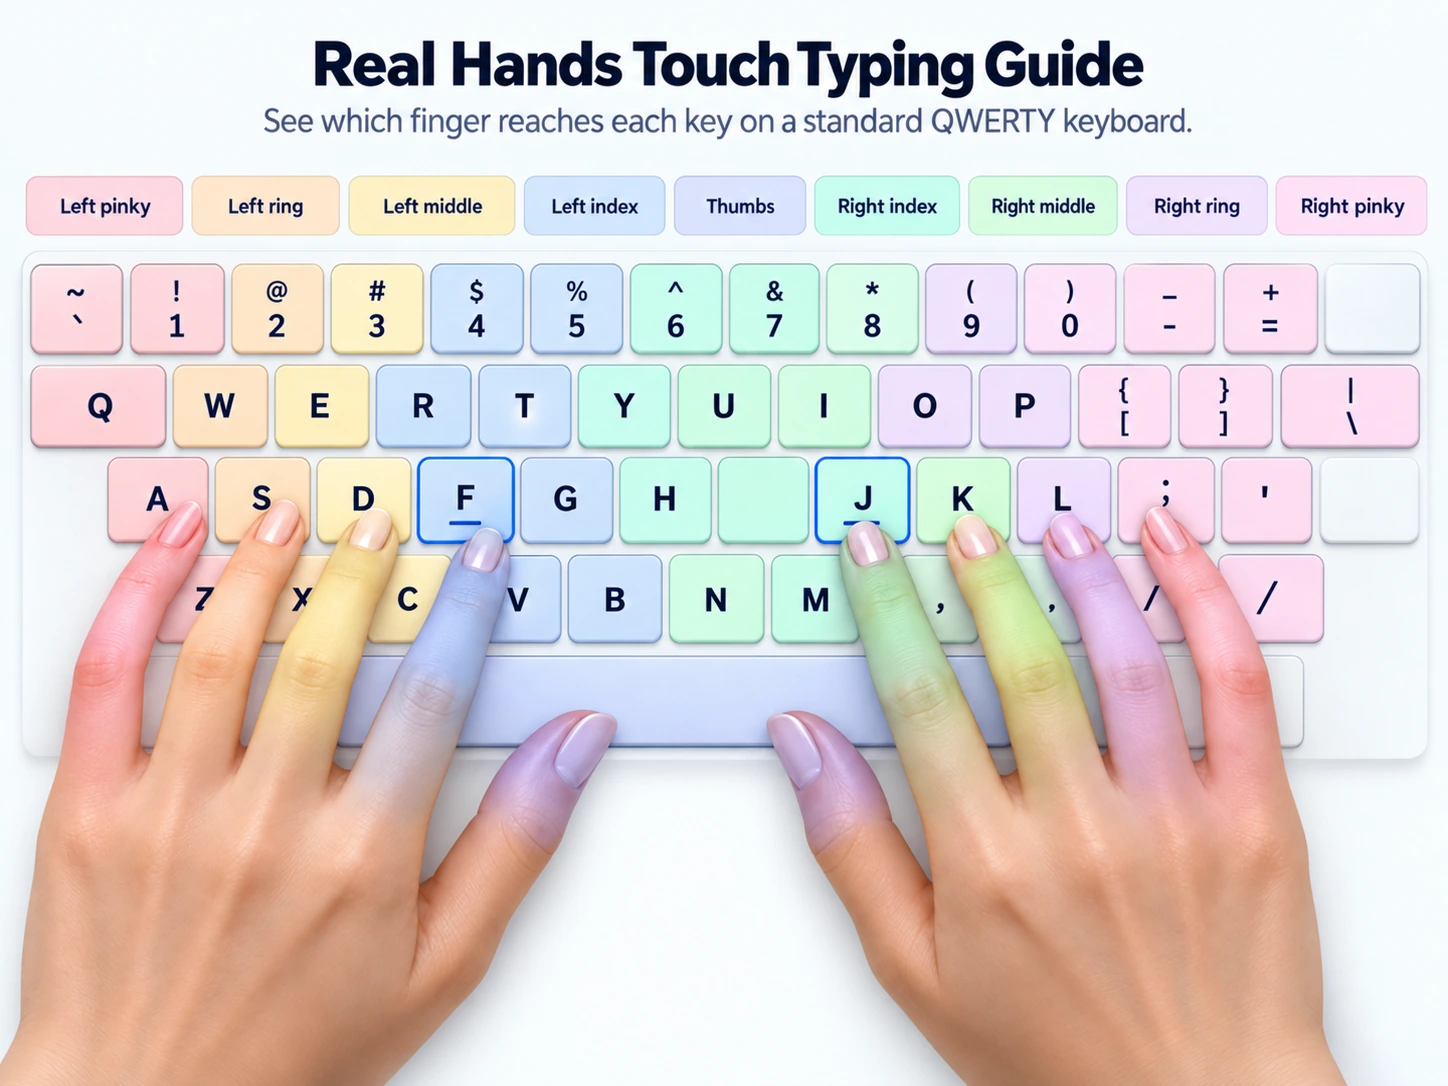
Two guides, one simple way to learn
- Finger chart without hands: select any letter and instantly find its assigned finger and home position.
- Guide with hands: compare the illustration to your own hand placement. Keep the wrists relaxed and fingers gently curved.
- Home-row anchors: place your left index finger on F and right index finger on J; most keyboards have small raised bumps on these keys.
- On-screen practice: use the highlighted key and the tutor’s visual Hand Guide while typing, so you need fewer glances at your physical keys.
Try this beginner finger-placement exercise
- Find your home row: rest your left little, ring, middle and index fingers on A, S, D, F. Rest your right index, middle, ring and little fingers on J, K, L, ;. Keep both thumbs near Space.
- Watch the screen: look at the target letter in the lesson or select a key in the chart above. The on-screen visual tells you which finger is assigned to it.
- Make one correct reach: for example, press D with your left middle finger, F with your left index finger, or J with your right index finger.
- Return to home position: gently bring the finger back to its starting key after each press. Avoid forcing speed, lifting the whole hand unnecessarily, or tensing your wrists.
- Repeat, then test yourself: complete a short guided lesson, review errors, and practise again. When accuracy feels steady, take a timed typing test to measure your WPM.
Beginner tip: in the first few sessions it is fine to glance at the on-screen guide. The goal is not to memorize the whole keyboard on day one, but to reduce reliance on the physical keyboard gradually. Accuracy and comfortable technique come before speed.
From correct finger placement to faster typing and a certificate
Use the hand guide as the first step of a complete learning path. You can learn the basics free, improve the keys that cause mistakes, check your typing speed and, when ready, take a qualifying certificate test.
Need evidence of your typing ability for a résumé or job application? When your skills are ready, explore TypingTutor.Online typing certificates and their qualifying tests. Certificates are issued by TypingTutor.Online, include verification information, and are not government-accredited credentials.
Set your hands before you start typing
- Place the left little, ring, middle, and index fingers on A, S, D, and F.
- Place the right index, middle, ring, and little fingers on J, K, L, and semicolon.
- Keep both thumbs relaxed near the space bar.
- Reach only the assigned finger toward upper or lower rows, then return it to home position.
- Use the raised F and J markers to reposition without looking at the keyboard.
Consistent finger responsibility is more important than forcing speed. When a key feels uncertain, slow down, use the correct finger, and repeat short patterns until the reach becomes automatic.
Frequently asked questions
Where should my fingers rest when touch typing?
On QWERTY, the left fingers rest on A S D F and the right fingers rest on J K L semicolon. The thumbs rest near the space bar.
Why are F and J important?
Most keyboards have small raised markers on F and J. They let the index fingers find the home row by touch without looking down.
Which finger presses B?
In many standard touch-typing systems, B is assigned to the left index finger, although some typists use the right index. TypingTutor.Online teaches a consistent map so practice stays predictable.
Can I learn typing without looking down at the keyboard?
Yes. Watch the highlighted on-screen keys, use the finger chart to find the correct finger, and practise returning to the home row. Gradually rely less on the visual prompts as you learn by touch.
Is the Real Hands typing guide free?
The interactive QWERTY finger chart and illustrated hands guide on this page are free. The optional live Real Hands lesson view is a Premium style. You can continue practising with the free Classic and Side Hands styles.
Does the realistic hands guide track my actual fingers?
No. The image is an educational illustration of keyboard hand placement, not a camera tracker. The interactive chart above gives individual key-to-finger guidance, and lessons show on-screen target keys.
Printable touch typing finger placement chart
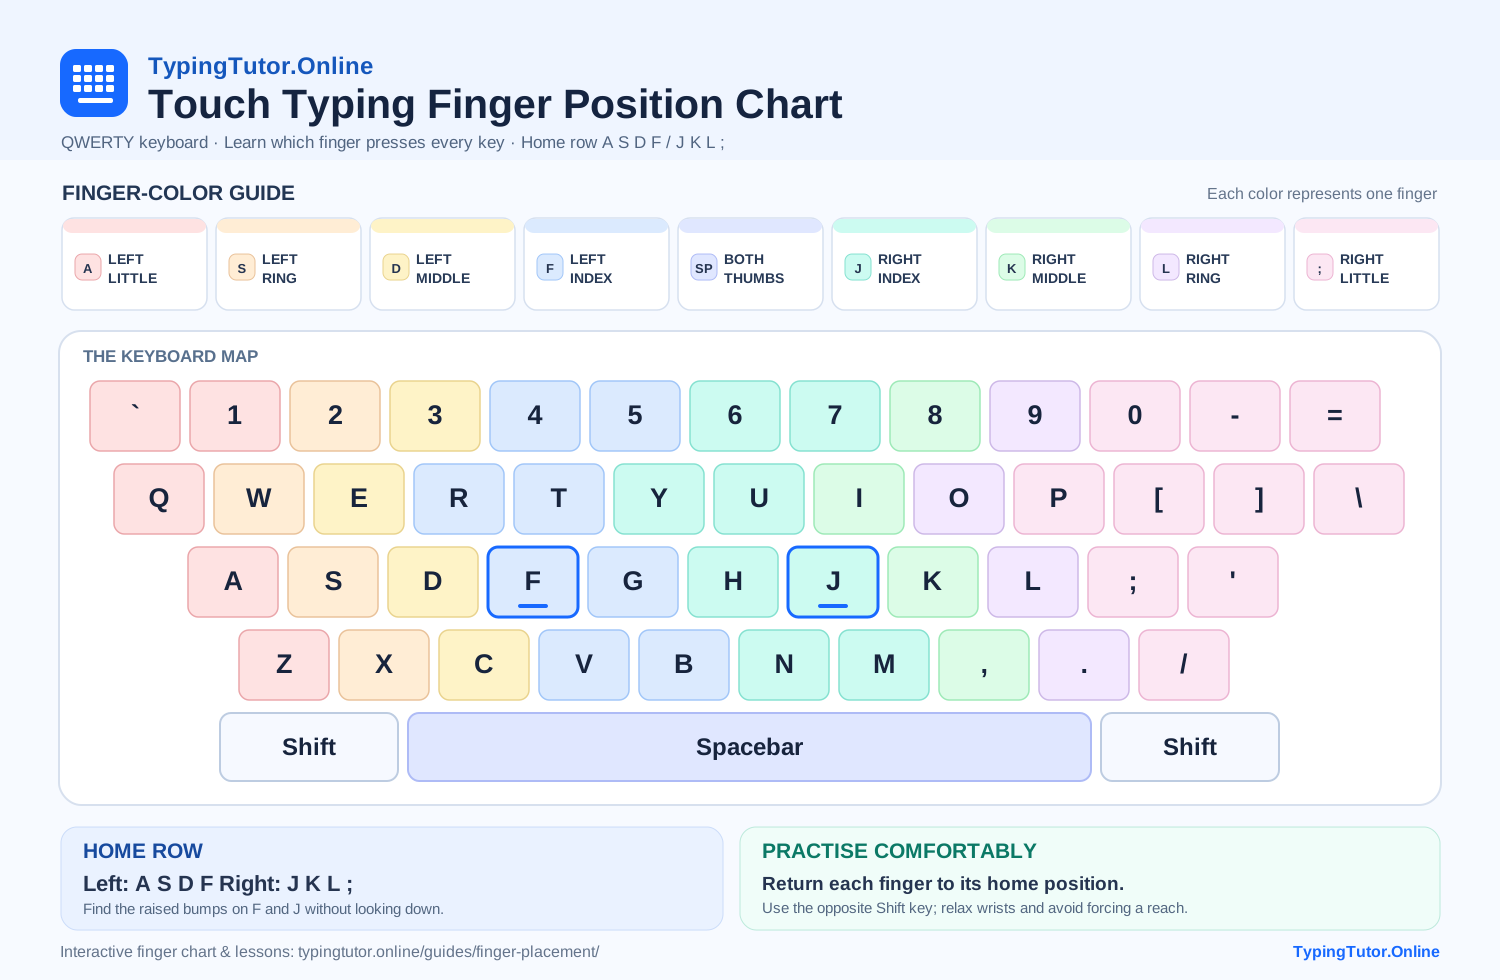
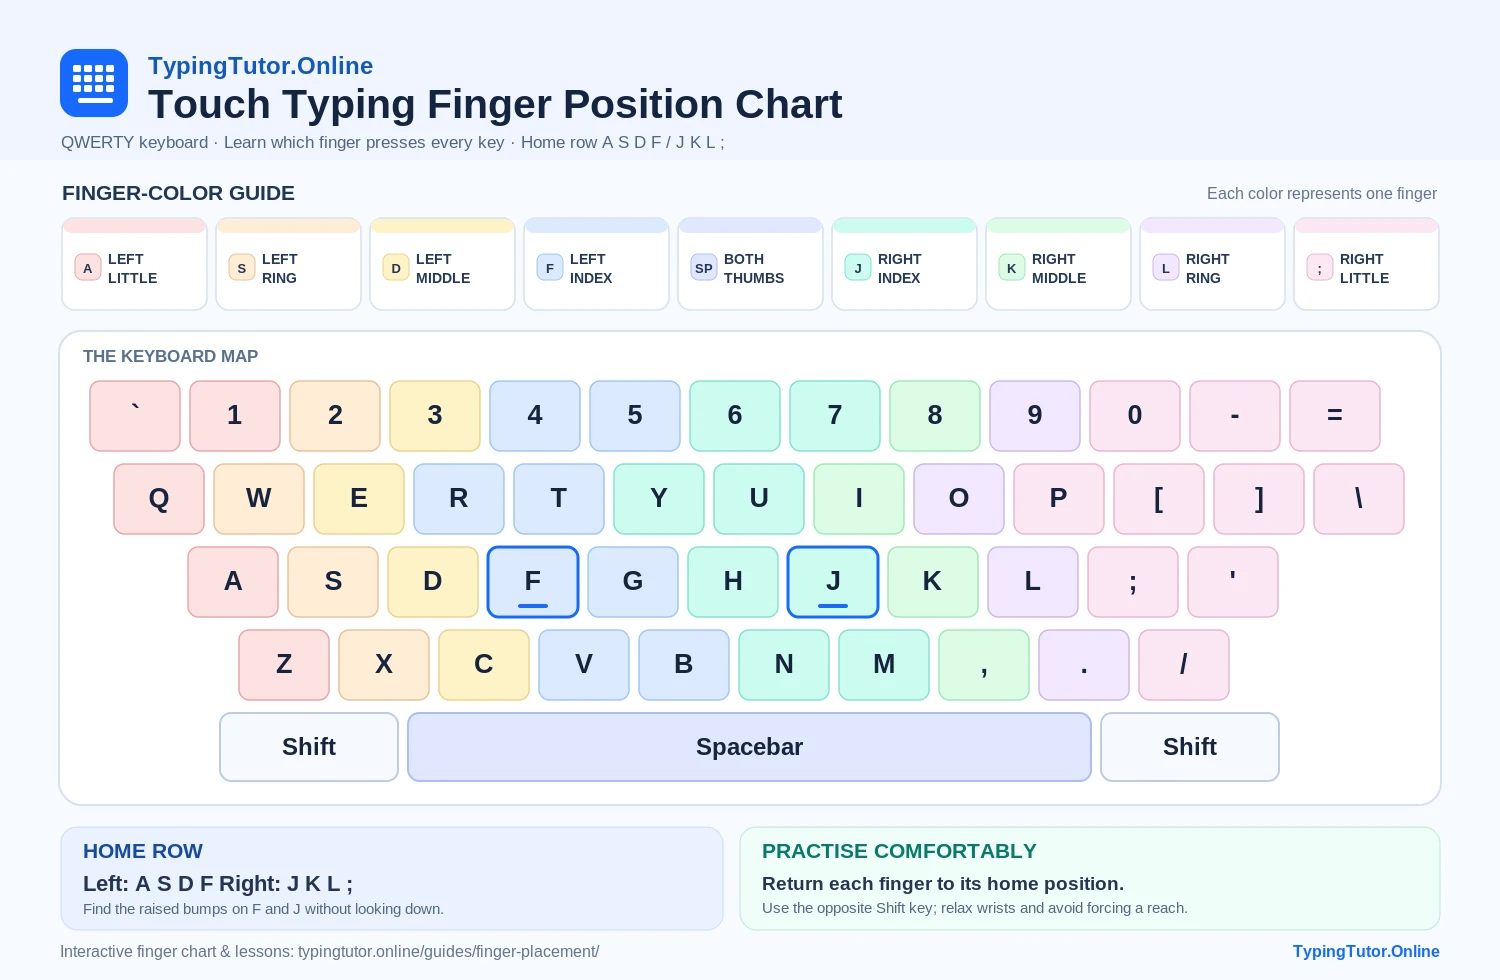
Keep a clear QWERTY finger chart beside your keyboard as you practise. The one-page A4 PDF and downloadable SVG use the same finger colors and key assignments as the interactive chart above, including F and J home-row markers, Shift, Spacebar, and all eight fingers.
Best for printing: download the one-page A4 landscape finger chart (PDF). It includes all nine finger/thumb colors, key assignments, home-row F/J markers and typing tips on a single sheet. You do not need to print the entire web page.
Learn the home position before reaching
For standard English QWERTY, place the left fingers on A, S, D and F and the right fingers on J, K, L and semicolon. The raised marks on F and J help the index fingers find their starting points. Keep the thumbs near Space. Return toward this home position after a reach, without pressing down or holding the hands rigidly.
A gradual practice sequence
Begin with a few home-row keys until you can find them without repeated glances. Add upper-row and lower-row reaches in small groups. Introduce capitals, punctuation and numbers after basic control becomes steadier. The chart is a reference for a conventional technique, not a requirement to master the whole keyboard in one session. Short, attentive practice is more useful than repeatedly rushing through mistakes.
Use Shift with the opposite hand
When possible, hold Shift with the hand opposite the letter being capitalized: right Shift for a left-hand letter, left Shift for a right-hand letter. This lets the typing finger make its usual reach. Use a comfortable thumb for Space. Larger keys such as Enter and Backspace may require a small hand movement; avoid straining to keep every finger fixed on the home row.
Adapt the technique to your keyboard and comfort
Compact keyboards, non-QWERTY layouts and individual mobility needs can change the most practical approach. Keep the keyboard within easy reach and use a light touch. If a position feels uncomfortable, pause and adjust it rather than forcing a rigid pose. The guide teaches a general typing method and is not a diagnosis or a treatment for pain.
Check learning with accuracy, then speed
Try a familiar paragraph and notice whether you can keep your eyes on the screen. Track repeated mistakes and practise those reaches deliberately. A temporary speed drop while changing technique is not unusual; compare similar tasks over time. Continue with the guided course, then use a short test to see how consistently the new movements hold up.